Cài đặt MySQL Semisynchronous Replication

Môi trường#

  • Centos 7
  • MySQL 5.6

mysql-masterslave

Cài đặt Master#

1. /etc/my.cnf

datadir=/var/lib/mysql
server-id=1
log_bin=/var/lib/mysql/mysql-bin
sync_binlog=0
expire_logs_days=7

  • Path của binlog mình cho nó vào thư mục datadir, nếu thay đổi thư mục datadir rồi thì path binlog cũng nên đổi theo cho tiện.

Khởi động lại service

service mysqld restart

2. Tạo user và cấp quyền

1
2
mysql> GRANT REPLICATION SLAVE ON *.* TO 'replicator'@'%' IDENTIFIED BY 'pascuaslave!!#';
mysql> FLUSH PRIVILEGES;
  • 'replicator'@'%': Tài khoản replicator đang được cấp quyền % = anywhere.

3. Lấy log position để slave biết điểm bắt đầu đọc dữ liệu

1
2
3
4
5
6
mysql> SHOW MASTER STATUS;
+------------------+----------+--------------+------------------+-------------------+
| File | Position | Binlog_Do_DB | Binlog_Ignore_DB | Executed_Gtid_Set |
+------------------+----------+--------------+------------------+-------------------+
| mysql-bin.000001 | 120 | | | |
+------------------+----------+--------------+------------------+-------------------+

Cài đặt Slave#

1. /etc/my.cnf

server-id=2
log_bin=/var/lib/mysql/mysql-bin
sync_binlog=0
expire_logs_days=7

Khởi động lại service

service mysqld restart

2. Kết nối tới master

1
2
3
mysql> CHANGE MASTER TO MASTER_HOST='10.148.0.3', 
MASTER_USER='replicator', MASTER_PASSWORD='pascuaslave!!#',
MASTER_LOG_FILE='mysql-bin.000001', MASTER_LOG_POS=120;
  • 10.148.0.3 server master ở đây sử dụng IP LAN
1
2
3
4
5
6
7
8
9
10
11
12
13
14
15
16
17
18
19
# Khởi động Slave
mysql> START SLAVE;

# Kiểm tra trạng thái
mysql> SHOW SLAVE STATUS\G;
*************************** 1. row ***************************
Slave_IO_State: Waiting for master to send event
Master_Host: 10.148.0.3
Master_User: replicator
Master_Port: 3306
Connect_Retry: 60
Master_Log_File: mysql-bin.000001
Read_Master_Log_Pos: 120
Relay_Log_File: mysqld-relay-bin.000005
Relay_Log_Pos: 283
Relay_Master_Log_File: mysql-bin.000001
Slave_IO_Running: Yes
Slave_SQL_Running: Yes
Seconds_Behind_Master: 0
  • Slave_IO_Running: Yes I/O thread kết nối tới master đang hoạt động.
  • Slave_SQL_Running: Yes SQL thread đọc ghi dữ liệu từ relay log đang hoạt động.
  • Seconds_Behind_Master: 0 Cho biết slave đang bị trễ bao nhiêu giây so mới master

Lưu ý 1:#

Chỉnh sửa dữ liệu ở slave thì sẽ dẫn tới replicate bị lỗi, do đó mình sẽ tạo 1 user mysql cho việc đọc dữ liệu từ slave.

1
2
3
4
5
6
# Cấp quyền select cho gagauser ở database gadevdb
mysql> GRANT SELECT on gadevdb.* to 'gagauser' IDENTIFIED BY 'passwordselect';

# Nếu muốn cấp quyền đọc tất cả db
mysql> GRANT SELECT on *.* to 'gagauser' IDENTIFIED BY 'passwordselect';

mysql-slave-change

Lưu ý 2:#

Nếu database đang hoạt động và đã có dữ liệu, cần thực hiện lock database và mang dữ liệu sang slave như sau
1. Trên master

1
2
3
4
5
6
7
8
9
10
11
12
13
14
15
16
17
# Lock the database to prevent any new changes
mysql> USE gadevdb;
mysql> FLUSH TABLES WITH READ LOCK;

# Dump dữ liệu
mysqldump -u root -p gadevdb > data-dump.sql

# Lấy position cho slave đọc dữ liệu
mysql> SHOW MASTER STATUS;
+------------------+----------+--------------+------------------+-------------------+
| File | Position | Binlog_Do_DB | Binlog_Ignore_DB | Executed_Gtid_Set |
+------------------+----------+--------------+------------------+-------------------+
| mysql-bin.000001 | 120 | | | |
+------------------+----------+--------------+------------------+-------------------+

# Unlock the database (making them write able again)
mysql> UNLOCK TABLES;

2. Trên slave
Thực hiện việc import trước khi kết nối tới master

1
2
3
4
mysql> CREATE DATABASE gadevdb;
mysql> CREATE DATABASE gadevdb CHARACTER SET utf8 COLLATE utf8_unicode_ci;

mysql -u root -p gadevdb < /home/mozaa/data-dump.sql

Semisynchronous Replication#

Dựa theo tài liệu trên dev.mysql.com sử dụng cơ chế Semisynchronous có thể giảm lag khi có nhiều slave.

1. Master

1
2
3
4
5
6
7
8
9
10
11
12
13
14
15
16
17
18
19
20
21
22
# 1. Cài đặt Plugin
mysql> INSTALL PLUGIN rpl_semi_sync_master SONAME 'semisync_master.so';

# Kiểm tra plugin đã cài đặt thành công chưa
mysql> SELECT PLUGIN_NAME, PLUGIN_STATUS
FROM INFORMATION_SCHEMA.PLUGINS
WHERE PLUGIN_NAME LIKE '%semi%';
+----------------------+---------------+
| PLUGIN_NAME | PLUGIN_STATUS |
+----------------------+---------------+
| rpl_semi_sync_master | ACTIVE |
+----------------------+---------------+


# 2. Bật semi sync
mysql> SET GLOBAL rpl_semi_sync_master_enabled = 1;
mysql> SET GLOBAL rpl_semi_sync_master_timeout = 1000;

## Hoặc có thể set ở file /etc/my.cnf
[mysqld]
rpl_semi_sync_master_enabled=1
rpl_semi_sync_master_timeout=1000 # 1 second

2. Slave

1
2
3
4
5
6
7
8
9
10
11
12
13
14
15
16
17
18
19
20
21
22
23
24
25
26
27
28
29
30
31
32
33
34
# 1. Cài đặt Plugin
mysql> INSTALL PLUGIN rpl_semi_sync_slave SONAME 'semisync_slave.so';

# 2. Bật semi sync
mysql> SET GLOBAL rpl_semi_sync_slave_enabled = 1;

## Hoặc có thể set ở file /etc/my.cnf
[mysqld]
rpl_semi_sync_slave_enabled=1

# Bật lại I/O thread
mysql> STOP SLAVE IO_THREAD;
mysql> STOP SLAVE;

mysql> START SLAVE;
mysql> START SLAVE IO_THREAD;

# Kiểm tra plugin đã hoạt động chưa, trên cả master và slave

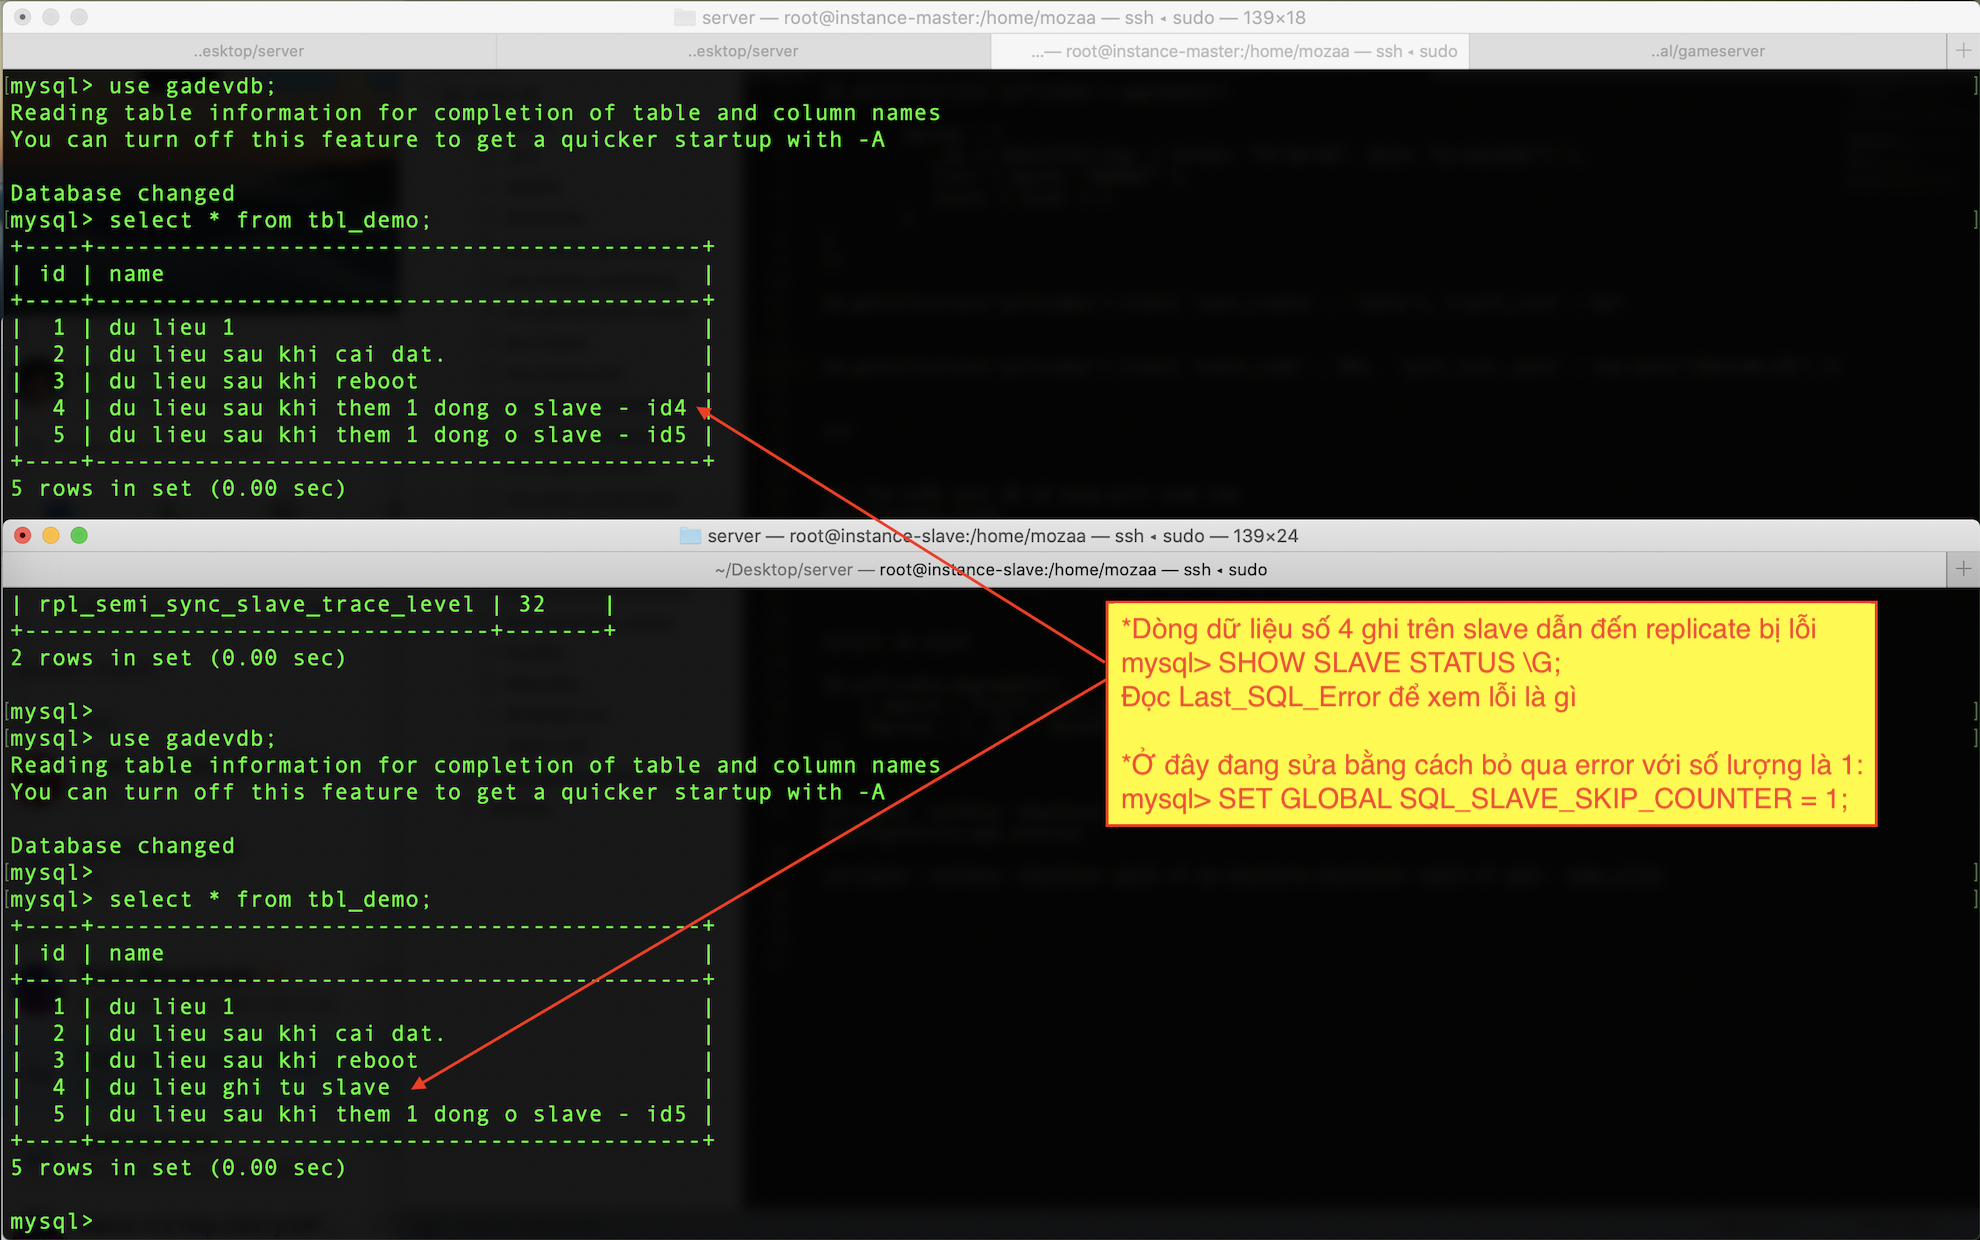
mysql> SHOW VARIABLES LIKE 'rpl_semi_sync%';
+---------------------------------+-------+
| Variable_name | Value |
+---------------------------------+-------+
| rpl_semi_sync_slave_enabled | ON |
| rpl_semi_sync_slave_trace_level | 32 |
+---------------------------------+-------+

mysql> SHOW STATUS LIKE 'Rpl_semi_sync%';
+----------------------------+-------+
| Variable_name | Value |
+----------------------------+-------+
| Rpl_semi_sync_slave_status | ON |
+----------------------------+-------+

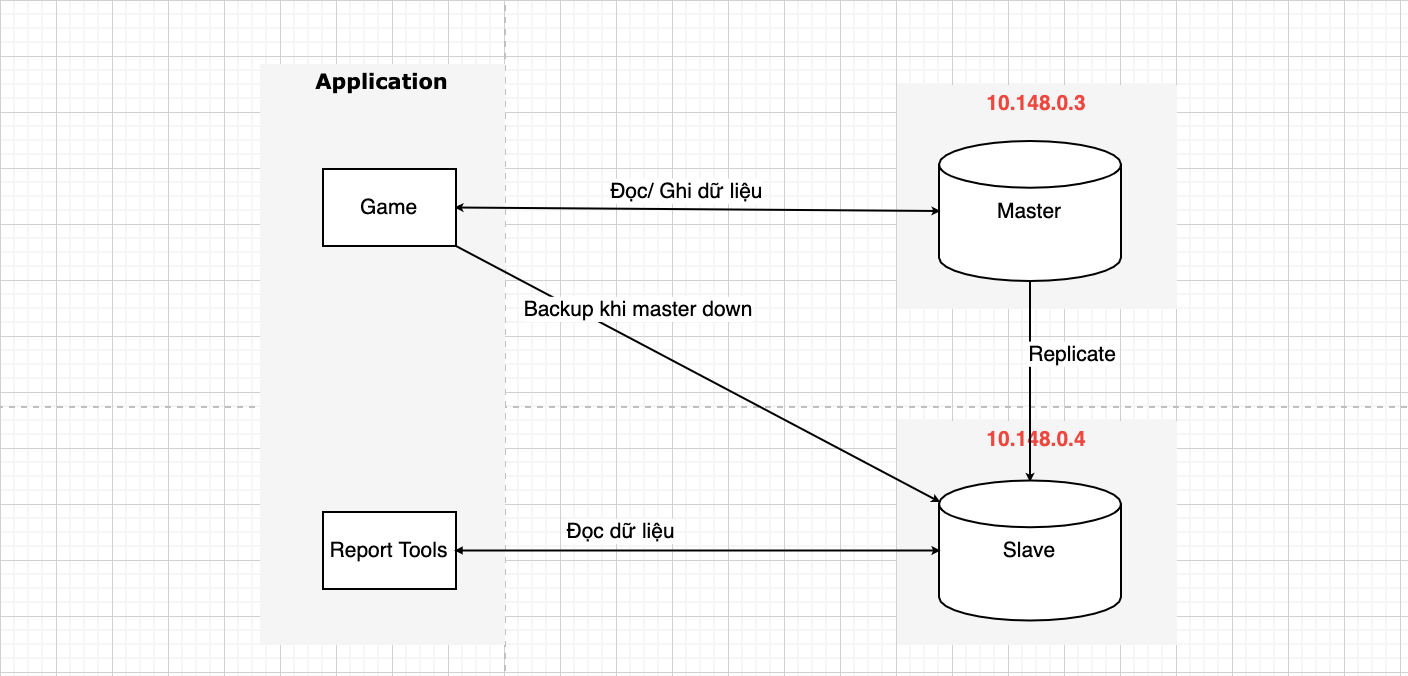
After a semisynchronous replication plugin has been installed, it is disabled by default. The plugins must be enabled both on the source side and the replica side to enable semisynchronous replication. If only one side is enabled, replication is asynchronous.